国外做论坛网站物联网开发
文章目录
- 模拟Spring底层详解
- 1、结合配置类,扫描类资源
- 1.1、创建需要扫描的配置类AppConfig,如下:
- 1.2、创建Spring容器对象LyfApplicationContext,如下
- 1.3、Spring容器对象LyfApplicationContext扫描资源
- 2、结合上一步的扫描,遍历其Map集合,创建对象
- 3、创建对象后,需要提供需要获取Bean的方法
- 4、总结
模拟Spring底层详解
前置准备:创建部分注解,具体如下
/*** 依赖注入注解信息*/
@Retention(RetentionPolicy.RUNTIME)
@Target(ElementType.FIELD)
public @interface Autowired {
}/*** 自定义一个注解是为了标识==>使用此注解之处的类资源需要交给Spring容器管理* 可自定义beanName*/
@Retention(RetentionPolicy.RUNTIME)
@Target(ElementType.TYPE)
public @interface Component {String value() default "";
}/*** 定于扫描类(bean)资源路径*/
@Retention(RetentionPolicy.RUNTIME)
@Target(ElementType.TYPE)
public @interface ComponentScan {String value() default "";
}@Retention(RetentionPolicy.RUNTIME)
@Target(ElementType.TYPE)
public @interface Scope {String value() default "";
}
两个service类,用于测试:
@Component
@Scope()
public class OrderService {
}
@Component
public class UserService {private String name;@Autowiredprivate OrderService orderService;public void testDemo(){System.out.println("Spring 创建 userService 实例成功");System.out.println("Spring 依赖注入 orderService 实例对象:"+orderService);}
}
一个测试类:
public class TestSpringDemo {public static void main(String[] args) throws Exception{LyfApplicationContext context = new LyfApplicationContext(AppConfig.class);UserService userService = (UserService) context.getBean("userService");userService.testDemo();}
}
1、结合配置类,扫描类资源
Spring在创建对象前,需要去扫描,确定需要交给Spring管理的类资源,具体的实现步骤模拟代码如下:
1.1、创建需要扫描的配置类AppConfig,如下:
/*** 这个类主要是用于定义扫描资源的路径信息*/
@ComponentScan("com.practice.service")
public class AppConfig {
}
1.2、创建Spring容器对象LyfApplicationContext,如下
/*** 这个类主要是用于模拟Spring容器的(bean的创建与获取bean等)*/
public class LyfApplicationContext {public LyfApplicationContext(Class config) throws Exception{}}
1.3、Spring容器对象LyfApplicationContext扫描资源
在LyfApplicationContext容器含参构造中,需要结合传入扫描资源的配置类AppConfig,对资源进行扫描,具体实现代码如下:
/*** 这个类主要是用于模拟Spring容器的(bean的创建与获取bean等)*/
public class LyfApplicationContext {public LyfApplicationContext(Class config) throws Exception{//判断传入的config类上是否有componentScan注解if (config.isAnnotationPresent(ComponentScan.class)) {//1、获取传入类上的注解ComponentScan信息==>主要是获取扫描路径ComponentScan componentScanAnnotation = (ComponentScan) config.getAnnotation(ComponentScan.class);//2、获取注解中的值String path = componentScanAnnotation.value();//3、将注解中的值"."换为"/"path = path.replace(".","/");//4、结合当前容器的类加载器,加载路径path下的class资源//4.1 先获取当前容器的类加载器ClassLoader classLoader = LyfApplicationContext.class.getClassLoader();//4.2 利用上一步获取的类加载器获取path路径下的class文件资源url信息URL resource = classLoader.getResource(path); //D:/JavaWorkSpace/2023/spring/spring-study-demo01/target/classes/com/practice/service//4.3 获取当前resource路径下的文件资源信息File file = new File(resource.getFile());//4.4 遍历file文件数据,获取file下的所有class文件资源if (file.isDirectory()) {for (File f : file.listFiles()) {String absolutePath = f.getAbsolutePath(); //获取到class资源的绝对路径信息==>目的是为了加载此类信息// 4.4.1 将此类的绝对路径做处理,截取一部分absolutePath = absolutePath.substring(absolutePath.indexOf("com"),absolutePath.indexOf(".class")).replace("\\",".");//com.practice.service.UserService//4.4.2 用上述得到的类加载器加载上述的absolutePath路径下的class资源信息==>目的是为了检查当前遍历的class资源上是否包含@Component注解try{Class<?> clazz = classLoader.loadClass(absolutePath);// 如果当前的对象实现了beanPostProcessor接口,需要将其加入beanPostProcessorList集合中if (BeanPostProcessor.class.isAssignableFrom(clazz)) {BeanPostProcessor instance = (BeanPostProcessor) clazz.getConstructor().newInstance();beanPostProcessorList.add(instance);}if (clazz.isAnnotationPresent(Component.class)) {//创建一个BeanDefinition对象,用于保存每个类的特征BeanDefinition beanDefinition = new BeanDefinition();beanDefinition.setType(clazz);//4.4.2.1 获取当前注解Component的值==>之定义的beanNameComponent annotation = clazz.getAnnotation(Component.class);String beanName = annotation.value();//如果当前传入的beanName为空的话==>利用默认的,也就是类名首字母小写作为beanNameif ("".equals(beanName)) {beanName = Introspector.decapitalize(clazz.getSimpleName());}//4.4.2.2 除此之外,还需要判断是否有Scope注解===>主要是判断当前的bean是否是单例或者是原型的if (clazz.isAnnotationPresent(Scope.class)) {//获取注解中的值Scope scopeAnnotation = clazz.getAnnotation(Scope.class);String value = scopeAnnotation.value();beanDefinition.setScope(value);}else {beanDefinition.setScope("singleton");}//将封装好的beanDefinition缓存到Map中beanDefinitionMap.put(beanName,beanDefinition);}}catch (Exception e){throw new Exception(absolutePath + "类加载失败",e);}}}}else {throw new Exception("缺少路径资源配置信息~~~");}}
}
其过程如下:
先结合传入扫描资源的配置类AppConfig,类上是否包含注解@ComponentScan,若包含注解,需要获取其注解中的参数信息(配置的扫描包路径),获取当前资源的类加载器,目的是为了获取target包下的class资源信息,获取到指定包路径下的class资源,利用其构造方法,创建对象,对对象中的属性以及对象上加入的注解信息进行遍历扫描,进行相关的逻辑处理,将其类元信息加入到BeanDefinition对象中,再将其封装为一个Map对象,在接下来的对象创建与获取的过程中做好基奠,其对象信息就是记录每一个类的特征,部分代码如下:
/*** 这个类主要是去记录下描述一个bean的特征*/
public class BeanDefinition {//类的类型private Class type;//创建类的方式==>单例还是原型等private String scope;public Class getType() {return type;}public void setType(Class type) {this.type = type;}public String getScope() {return scope;}public void setScope(String scope) {this.scope = scope;}
}
2、结合上一步的扫描,遍历其Map集合,创建对象
/*** 这个类主要是用于模拟Spring容器的(bean的创建与获取bean等)*/
public class LyfApplicationContext {public LyfApplicationContext(Class config) throws Exception{//判断传入的config类上是否有componentScan注解if (config.isAnnotationPresent(ComponentScan.class)) {//1、获取传入类上的注解ComponentScan信息==>主要是获取扫描路径ComponentScan componentScanAnnotation = (ComponentScan) config.getAnnotation(ComponentScan.class);//2、获取注解中的值String path = componentScanAnnotation.value();//3、将注解中的值"."换为"/"path = path.replace(".","/");//4、结合当前容器的类加载器,加载路径path下的class资源//4.1 先获取当前容器的类加载器ClassLoader classLoader = LyfApplicationContext.class.getClassLoader();//4.2 利用上一步获取的类加载器获取path路径下的class文件资源url信息URL resource = classLoader.getResource(path); //D:/JavaWorkSpace/2023/spring/spring-study-demo01/target/classes/com/practice/service//4.3 获取当前resource路径下的文件资源信息File file = new File(resource.getFile());//4.4 遍历file文件数据,获取file下的所有class文件资源if (file.isDirectory()) {for (File f : file.listFiles()) {String absolutePath = f.getAbsolutePath(); //获取到class资源的绝对路径信息==>目的是为了加载此类信息// 4.4.1 将此类的绝对路径做处理,截取一部分absolutePath = absolutePath.substring(absolutePath.indexOf("com"),absolutePath.indexOf(".class")).replace("\\",".");//com.practice.service.UserService//4.4.2 用上述得到的类加载器加载上述的absolutePath路径下的class资源信息==>目的是为了检查当前遍历的class资源上是否包含@Component注解try{Class<?> clazz = classLoader.loadClass(absolutePath);// 如果当前的对象实现了beanPostProcessor接口,需要将其加入beanPostProcessorList集合中if (BeanPostProcessor.class.isAssignableFrom(clazz)) {BeanPostProcessor instance = (BeanPostProcessor) clazz.getConstructor().newInstance();beanPostProcessorList.add(instance);}if (clazz.isAnnotationPresent(Component.class)) {//创建一个BeanDefinition对象,用于保存每个类的特征BeanDefinition beanDefinition = new BeanDefinition();beanDefinition.setType(clazz);//4.4.2.1 获取当前注解Component的值==>之定义的beanNameComponent annotation = clazz.getAnnotation(Component.class);String beanName = annotation.value();//如果当前传入的beanName为空的话==>利用默认的,也就是类名首字母小写作为beanNameif ("".equals(beanName)) {beanName = Introspector.decapitalize(clazz.getSimpleName());}//4.4.2.2 除此之外,还需要判断是否有Scope注解===>主要是判断当前的bean是否是单例或者是原型的if (clazz.isAnnotationPresent(Scope.class)) {//获取注解中的值Scope scopeAnnotation = clazz.getAnnotation(Scope.class);String value = scopeAnnotation.value();beanDefinition.setScope(value);}else {beanDefinition.setScope("singleton");}//将封装好的beanDefinition缓存到Map中beanDefinitionMap.put(beanName,beanDefinition);}}catch (Exception e){throw new Exception(absolutePath + "类加载失败",e);}}}}else {throw new Exception("缺少路径资源配置信息~~~");}}//创建对象for (Map.Entry<String, BeanDefinition> definitionEntry : beanDefinitionMap.entrySet()) {//获取BeanDefinitionMap中的key和valueString beanName = definitionEntry.getKey();BeanDefinition definition = definitionEntry.getValue();//判断当前的BeanDefinition对象是否是单例if ("singleton".equals(definition.getScope())) {Object bean = creatBean(beanName, definition);singletonMap.put(beanName,bean);}}/*** 创建bean对象* @param beanName bean名称* @param definition 对象描述封装类* @return* @throws Exception*/public Object creatBean(String beanName, BeanDefinition definition) throws Exception {//创建当前对象==>且放入单例池中(单例的Map中)Class clazz = definition.getType();try {Object instance = clazz.getConstructor().newInstance();//判断当前的对象中是否有@autowide(依赖注入)注解 ,如果包含这个注解,需要将其字段进行赋值for (Field field : clazz.getDeclaredFields()) {if (field.isAnnotationPresent(Autowired.class)) {field.setAccessible(true);field.set(instance, getBean(field.getName()));}}//回到方法==>beanNameAwareif (instance instanceof BeanNameAware) {((BeanNameAware) instance).setBeanName(beanName);}//初始化前方法if (beanPostProcessorList.size() > 0) {for (BeanPostProcessor beanPostProcessor : beanPostProcessorList) {instance = beanPostProcessor.postProcessBeforeInitialization(instance, beanName);}}//初始化if (instance instanceof InitializingBean) {((InitializingBean) instance).afterPropertiesSet();}//初始化后(切面AOP)if (beanPostProcessorList.size() > 0) {for (BeanPostProcessor beanPostProcessor : beanPostProcessorList) {instance = beanPostProcessor.postProcessAfterInitialization(instance, beanName);}}return instance;} catch (Exception e){throw new Exception("创建对象失败~~~",e);}}
}
3、创建对象后,需要提供需要获取Bean的方法
/*** 定于一个方法是获取bean资源的*/public Object getBean(String beanName) throws Exception {//判断当前的BeanDefinitionMap中是否存在beanName为key的beanDefinitionif (!beanDefinitionMap.containsKey(beanName)) {throw new Exception("当前beanName在BeanDefinitionMap中不存在~~~");}//从BeanDefinitionMap中获取到BeanDefinition信息==>判断其scopeBeanDefinition beanDefinition = beanDefinitionMap.get(beanName);//单例if ("singleton".equals(beanDefinition.getScope())) {Object singletonBean = singletonMap.get(beanName);if (singletonBean == null) {singletonBean = creatBean(beanName,beanDefinition);singletonMap.put(beanName,singletonBean);}return singletonBean;}else {//原型Object prototypeBean = creatBean(beanName,beanDefinition);return prototypeBean;}}
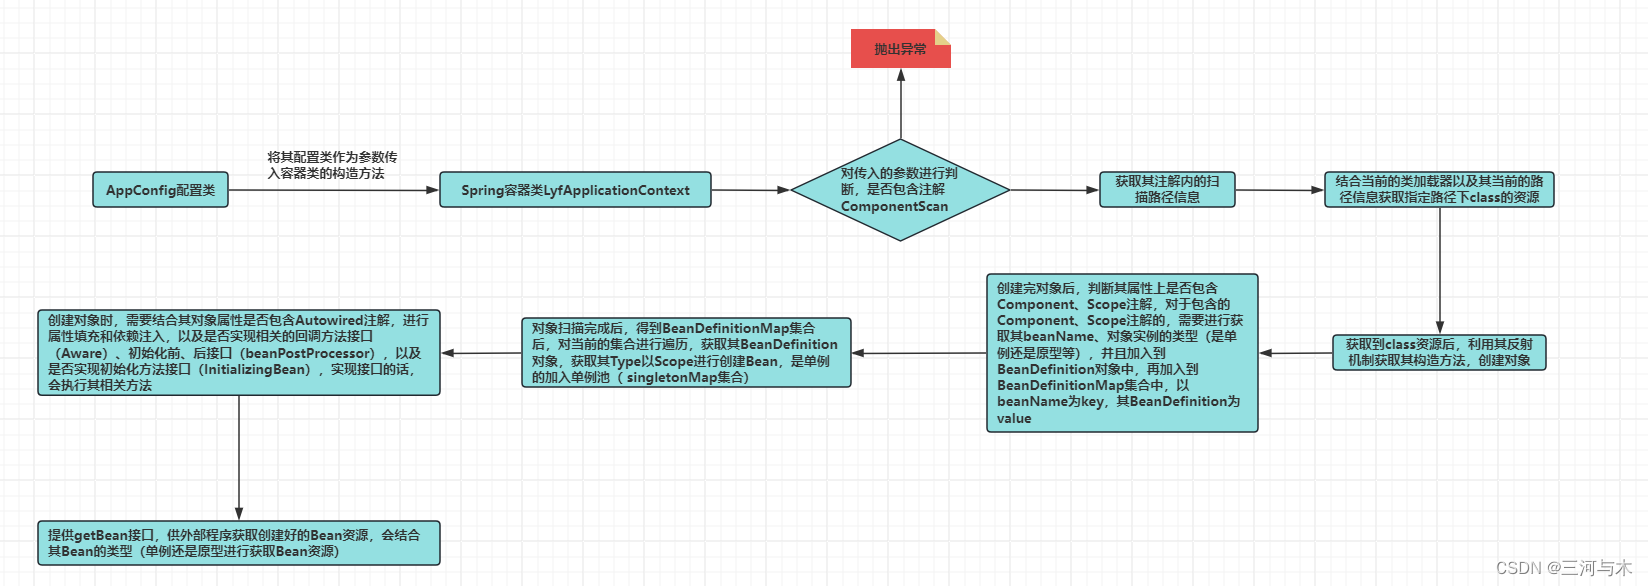
4、总结
总的来说,在Spring创建对象的过程中,主要分为,结合传入的类路径信息,扫描需要创建的对象资源=>结合上一步的扫描结果创建对象=>将创建好的对象提供一个对外获取Bean接口,具体详细过程图示: